BigReactors is a mod developed by erogenousbeef which is designed to supply large amounts of energy for technology based modpacks. It is arguably the most popular of the reactor-based mods and it currently in many of the packs on DeVco.
How To Make Big Reactors[]
A basic Big Reactor is a small 3x3x3 multi-block structure. It requires at a minimum 22 Reactor casings, a Reactor Controller, an intake port to get fuel into it, an export port to get waste out, a fuel Control Rod, and a Reactor Power Tap which supplies power to whatever cable you attach to it.
In order to make even the smallest 3x3x3 reactor you are required to have a supply of Yellorium ingots, both for the crafting of the parts and also as fuel which will be needed to burn to make energy. Yellorium is made from Yellorite Ore which can be mined near the bedrock layer (Y elevation 0-9 on most servers).
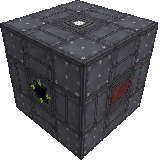
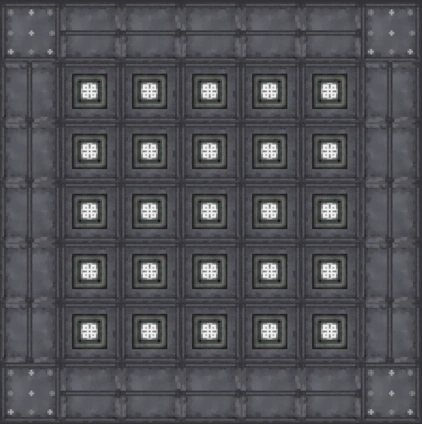
Micro BigReactor
Several tutorials already exist to help you get started with a basic reactor so please reference them if you are new to the mod. Once you are familiar with the basics then the rest of this guide will prove much more useful as a How-to-Design and How-to-Manage your setup.
Tutorial Links One should however note that building the smallest (3x3x3) variant of this reactor will only produce about 270 RF/tick so it is really not that useful for anything other than its educational value or in the very earliest stages of the game. Reactors, passive reactors at least, can be designed to produce anywhere from 270 RF/t to around 2,000,000 RF/t at its maximum size. Even during the early stages of the game it is strongly recommended to build a reactor that will allow you to expand. As reactors are generally designed from the top down this means you want to start with a reactor that will allow you to expand up or down once you have the need and required resources. See Reactor Design Principles for more info.
Passive Versus Active Reactors[]
Big Reactors come in two variants, Passive and Active.
Passive reactors are simply stand alone power generators. They take Yellorium ingots as fuel (and also Uranium on some mod packs) and burn it to make energy. They can be sized to enormous proportions but the energy produced will always be a factor of the fuel it consumes. Reactor design for passive reactors can be complex, especially as you move to larger and larger reactors. Many players only use passive reactors as it is very difficult to outgrow them and once you understand them they are very easy to manage.
Active reactors burn fuel to make heat which turns water into steam. The steam is then vented into a turbine which makes the energy. The turbine is separate multi-block structure. Why? The principle is simply that you can run several turbines from a single reactor which in theory would allow you to produce more power for less fuel. The increased complexity of the design however prohibits many people from doing this as you need to know how to really fine tune both the reactor and the turbine(s). This complexity quite often results in less efficient or less flexible implementations.
For the rest of this article we will focus on Passive reactors only. The reason for this is that more people use them so it is more usable/useful information. But the bigger reason is one of scale. Passive reactors can scale up to 2,000,000 RF/t. This is more output than any active reactor setup I have ever seen (even on Youtube and streams). One of the biggest constraints for a mega-sized active reactor is actually a mega-sized water supply. The reactor's ability to draw in water fast enough is the first problem but the internal water buffer is also a prohibitive hard constraint. This does not mean that active reactors are invalid, on the contrary they are extremely valid and useful and can expand your power output to incredible levels - if you know how to build and manage them. But the body of knowledge required to do that exceeds the scope of this guide and is better left to it's own guide.
Passive Reactor Control Principles[]
Manual Method[]
The easiest method for managing your reactor (aside from letting it run on it's own for eternity) is just to manually turn it on and off when your power storage runs low. And believe it or not, this is a very common method even for the largest and most complex systems. If you take this route, plan on having a lot of energy storage. Otherwise you will be running over to your reactor controller a lot to turn it on and off.
RedNet Method[]

Simple RedNet Manager
An easy and hands-free method for managing production of a passive reactor is using RedNet. BigReactors comes with a RedNet Port block that can be part of the multi-block structure (replace any non-corner part with a RedNet Port). The quickest and easiest way is to add two RedNet Ports to your rector and connect them with a RedNet Cable. Set one port to "Output: Energy Amount" (and hit commit) and the other port to "Input: Change Control Rod Insertion" (again, hit commit button).
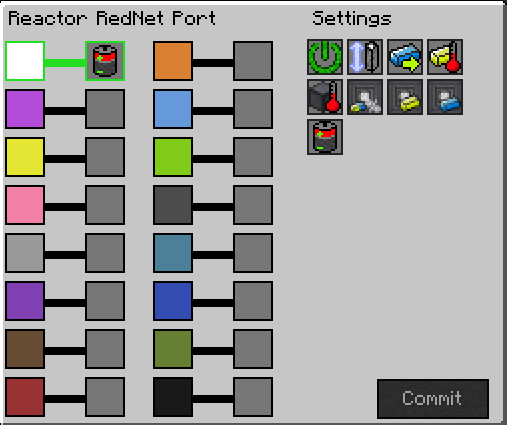 Output: Energy Amount |
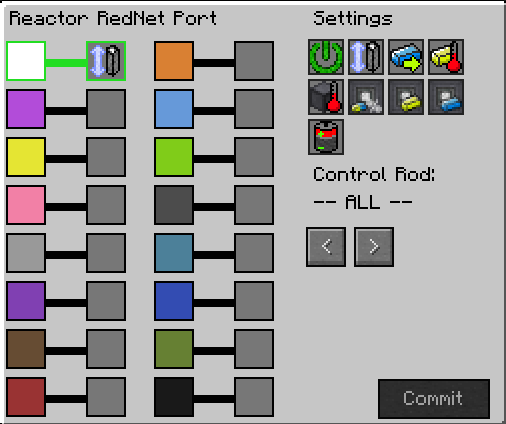  Input: Change Control Rod Insertion |
Effectively, the production of the reactor will always be inversely propositional to the battery level of the reactor. If your buffer is at 80% then the control rods will be set to 80 which will produce 20% of the maximum power. As the energy buffer approaches full then the control rods will produce less and less energy until it reaches the level required to supply whatever power is currently being used (which if your machines are all off will be zero). It is very simple, can be set up in about 10 seconds and provides complete management of the reactor based on current energy demands.
Computer Method[]
Big Reactors also comes with a Computer Port. This port can also replace any of the non-frame blocks of the reactor. If connected to a ComputerCraft or OpenComputers computer you can run a LUA program to manage your reactor. The advantage to this method is that it gives you complete control over your reactor. You can set variables to turn on, increase power at certain thresholds and turn it off. You can check the performance of your turbines and use it to manage the steam production of an active reactor. The only thing that limits your ability to control the reactor is your ability to develop the computer program used to manage it.
Links to some useful LUA management programs:
SafeReactor - a Big Reactors control program for ComputerCraft by Kai Kikuchi
SafeReactor - a Big Reactors control program for OpenComputers by Kai Kikuchi
BR_Mgr - a high efficiency Passive Reactors control program for OpenComputers by Rbooks
For those new to the mod I strongly suggest the RedNet method. It provides a very simple way to manage fuel consumption while allowing you to use the full capacity of the reactor when needed. You can achieve a very stable and cost effective reactor for very little time and resource. And you never have to remember to turn on the reactor to charge up your storage batteries.
Efficiency of a Passive Reactor[]
Many people build reactors set them to run and walk away. And doing this will always provide the most power for the reactor in question. But it will also burn fuel at the fastest rate possible and this is never a desirable thing. Fuel efficiency of the passive reactor can best be compared to a car. Your fuel efficiency rating is based on Distance/fuel, MPG in the US (Miles per Gallon). Or more to the point, the output / input. You get so many miles of output for your given input of fuel. The same applies to your reactor.

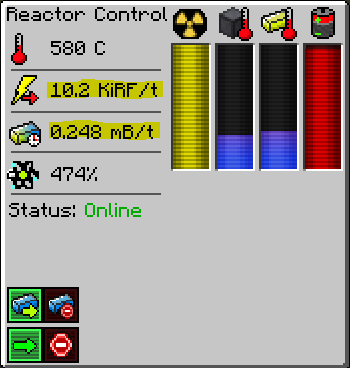
As you look at the Reactor Controller UI you see a lot of stats for the current operation of the reactor. The ones you should care about from an efficiency standpoint are RF/Tick (the energy output from the reactor) and mB/tick (what is put into it as fuel). The problem is there is no value on the GUI that tells you the RF/mB. So you can either do the math yourself or use a simulator to figure it out. The point is your passive reactor efficiency should always be viewed as RF/mB or how much energy made per each amount of fuel.
The second thing to realize is that your reactor's efficiency changes depending on the insertion setting of the control rods. The result is an efficiency curve which peaks at some insertion setting. This is your reactor's optimal control rod insertion level. Why is this important? Because your reactor can be set to burn a lot of fuel or it can be set to burn as efficiently as possible. The difference can be staggering. Even for a small reactor you can double your fuel efficiency. For the biggest reactors your efficiency can range from 12 kRF/mB at 0 percent insertion to 250 kRF/mB at 99% insertion (which is its optimal level). Yes, it is that drastic!
The last consideration is the coolant. Lots of things can be used (especially in some mod packs). But the benefits are not that significant as long as you are using one of the big-3: Gelid Cryotheum (best), Resonant Ender (next best) or Destabilized Redstone (3rd best). For most reactors the difference between these three coolants is negligible so most people just use Resonant Ender. Large reactors would get a benefit from Cryotheum so it should be considered on the large implementations.
So what does this really mean for you and the reactor you are going to build? Well, it means you should not build the the reactor design that provides you with just the right amount of energy at its maximum settings. Instead you want to build so that you are getting the power you want at or near its optimal setting. And you want to run it at its optimal setting whenever possible. This will give you the most energy for the fuel you put into it.
Passive Reactor Design Principles[]
Now for the controversy!!! Everyone has a design they believe is the most efficient regardless of size or coolant or whatever. The "truth" is much simpler than people may have you believe. A good reactor design is simply one that has the most control rods packed in it but still has enough coolant to keep the core heat down so your fuel doesn't burn up too quickly. The number and length of the fuel rods mainly determines the power output - it's that simple. The coolant helps to manage the temperature which in turn determines the fuel burn up rate. So how hot is too hot? Well, therein lies the problem... and the controversy...
To this point nothing has been implemented in the mod which would cause a reactor to explode or malfunction at a given temperature. The mod author, erogenousbeef, has talked about implementing one but to my knowledge never has. So there are no hard constraints. The only real trick then is finding the "tipping point" where the temperature causes the fuel to burn too quickly. You use coolant to manage the temperature. And coolant can effect any control rod within 4 blocks (exact distance is not confirmed).
For small reactors (1x1 to 4x4 core) you really don't need any coolant - it really doesn't need it at that size. Anything bigger than that should be designed with these few "rules" in mind.
- More control rods means more power and efficiency for a reactor's given dimensions
- Every control rod needs to be in range of coolant (4 blocks)
- Coolant "should" represent 16-24% of the core design (viewing from the top not including frame)
Arguments will undoubtedly ensue as they have all over the internet when the topic is discussed. Some say the "X" or "checkerboard" pattern is best. Others claim that the "+" or "tic-tac-toe" pattern is better. But the math doesn't support it, nor do the simulations or the in-game implementations. The truth is that the more control rods you can pack into the reactor the better it will perform - as long as they are all within 4 blocks of coolant to manage the heat.
  No Coolant |
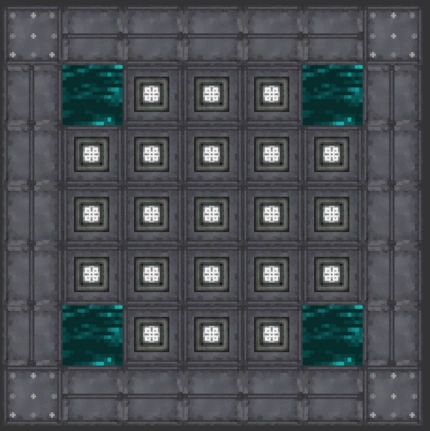  4-Corners |
  Full Ring |
  X Pattern |
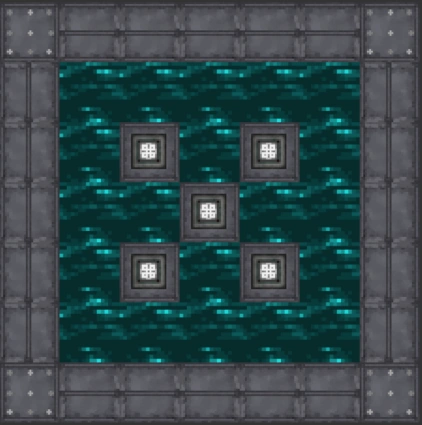
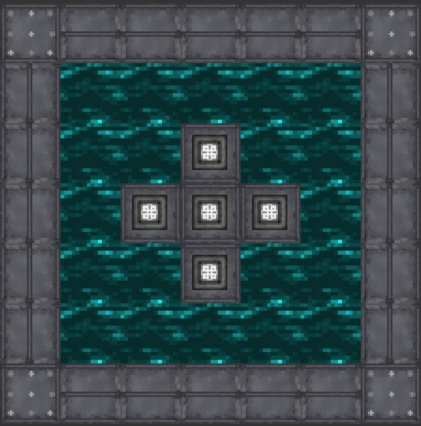  + Pattern |
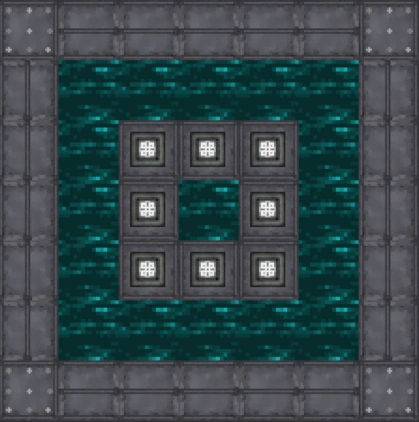  O Pattern |
| 5x5x20 core (7x7 with casings) | Rods | Optimal kRF/mB | Optimal Insertion | Max kRF |
|---|---|---|---|---|
| No Coolant | 25 | 134.1 | 96 | 66.5 |
| 4-Corners | 21 | 134.7 | 95 | 69.2 |
| Full Ring of Coolant | 9 | 131.2 | 90 | 54.4 |
| Ring with "X" Pattern | 5 | 100.0 | 80 | 44.2 |
| Ring with "+" Pattern | 5 | 118.2 | 85 | 43.4 |
| Ring with "O" pattern (alt "+") | 8 | 126.2 | 87 | 52.8 |
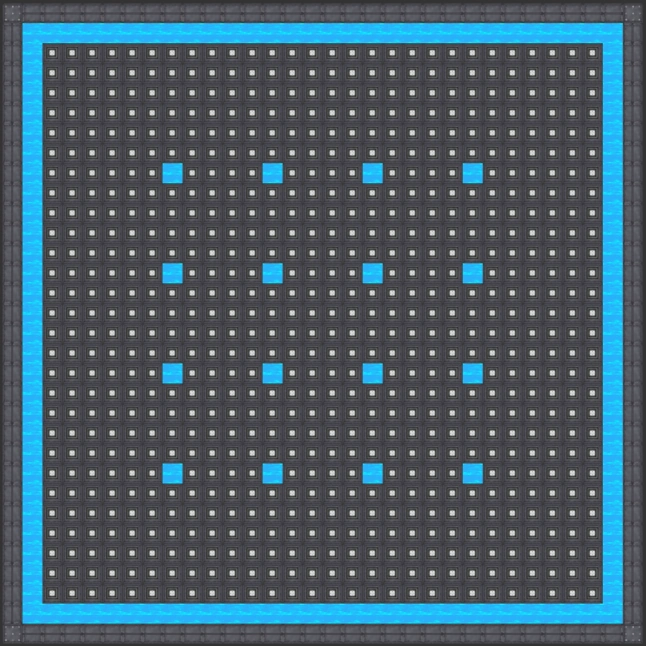
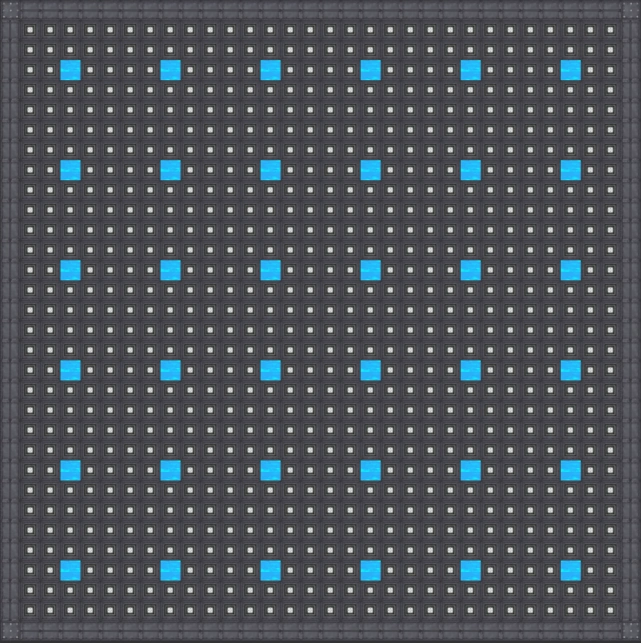
Much to the dismay of many designers out there, having no coolant for a reactor of this size will produce better power and efficiency than all but one design... The "4-Corners" method best fits the design rules above for a 5x5 reactor core and has proven to produce the best results. These principles also extend to the largest reactors, 30x30x46 core (max size allowed by the mod), as seen in these top-tier designs.
  247.5 kRF/mB and 1,967 kRF Max Best Balance |
  241 kRF/mB and 2,025 kRF MaxBest Maximum RF |
  250 kRF/mB and 1,910 kRF Max Best Efficiency |
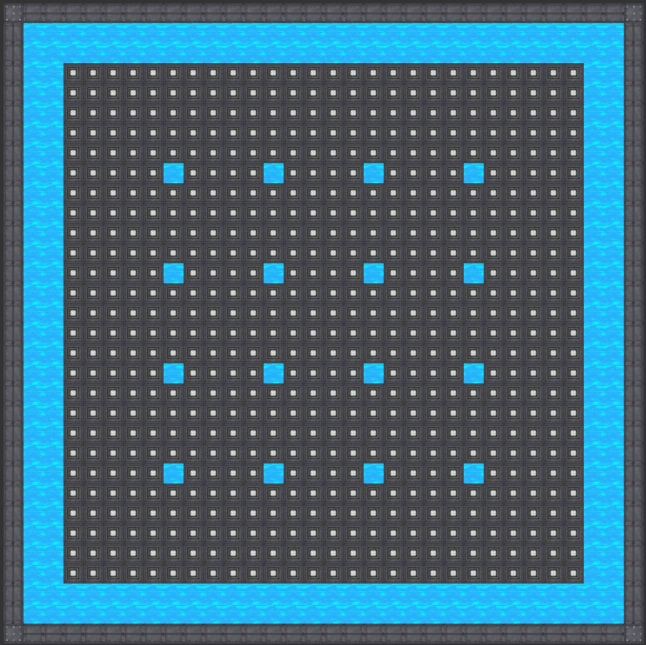
So what does this mean for your reactor design? Well, if you have a micro reactor (up to a 4x4 core) you don't need, and therefore should not use, any coolant at all. If your reactor is small (5x5 core) you only need a few blocks of coolant in the corners. If your reactor is medium sized (up to 11x11 core) the best design is simply a solid core of packed control rods surrounded by a single layer of coolant surrounded by the casings. If your reactor is more than 12 blocks on both horizontal axes (X&Z) then you also need to add a few spots of coolant to ensure that every control rod is within 4 blocks of coolant. That;s it!!
"Grow As You Go" Big Reactor Strategy[]
So what can you do with all this information - what does this mean for your base on your server? The suggested approach is to build a reactor early, as soon as you have a modest supply of Yellorium. Pick a place in your base where you can build a "Starter Reactor" with a 5x5 core (7x7 with the casings).

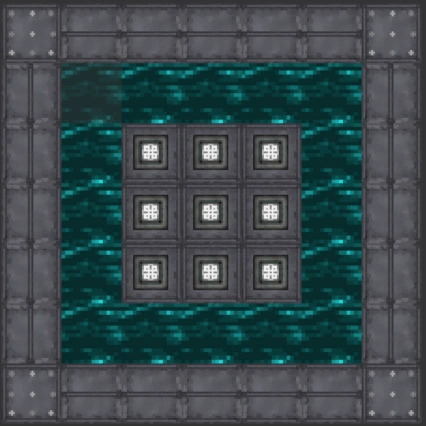
Best 5x5 core BigReactor design
The height of the Starter Reactor should be as tall as you have resources to build with a stack or two of yellow stuff left over to use as fuel for a while. You should try and get two or three layers of fuel rods in there though. Fill the whole interior with control rods except the corners. The corners should be filled with coolant (either redstone or ender will be fine). A 5x5x3 reactor of this design will make about 4 kRF/t at 90% insertion while using 0.04 mB/t and can burst to over 13 kRF/t if you need it. Make sure you have a RedNet manager on it from the start so that one stack of Yellorium will last for many days of playtime.
If your power tap is unable to push out enough power with your current cable, consider upgrading to higher tier cables or consider using a Tesseract to transfer power. The Tesseract will allow you to transfer a theoretical infinite amount of power to the receiving side. The power tap also has no limit to the amount of power it can transfer and so you can just place the Tesseract directly on it set to send power. If you do not have the resources to make Tesseracts then additional power taps will allow you to use additional cable lines to transfer power. If you need to go down this route, then you should consider Thermal Dynamics Fluxducts. These cables will transfer the rated power for each input and output connection. For instance if you had a battery that output 1000 rf/t, if you connected Leadstone Fluxduct to five output sides then you could then power five machines for 200 rf/t each with the same cable line. This way if you used Redstone or Resonant Fluxduct you would not have to separate the cable lines when using multiple power taps and still pull off many tens of thousands of RF per tick.
As you get more resources, you can make your reactor bigger in order to improve its efficiency and power output. You can extend the reactor's height, width, or length, it does not need to be square or cubed in its design, only cuboid (six faces). The only thing you really need to know is that bigger (taller/wider/cubed-er) reactors of the same design will output more power for sometimes less fuel. When you do extend the dimensions of the reactor your power output will be a lot larger, but your reactor can still be configured to output only as much power as you draw upon using tools like the rednet port setup. This means that you won't be wasting power and your fuel will last a lot longer.
Chunk Boundaries[]
A known bug with Big Reactors is that they will sometimes dump some or even all of the yellorium contained in the fuel rods. This happens when a reactor is built across two or more chunks. When the chunks are loaded, after having been unloaded previously by lack of a chunk loader or nearby player, there is a chance that the reactor will lose some data and forget that it had yellorium in the fuel rods in a particular chunk. This means a large reactor runs the risk of dumping a large amount of its fuel if it is not kept constantly loaded, however server restarts and client crashes may make this unavoidable.
One of the solutions to this is to keep the entire multiblock structure of your reactor within one chunk. This means that the largest reactor you would make would be 16x16 wide and long. For designs that rely on the size of the reactor being odd or even to make the spacing between fuel rods and the casing edge a certain distance you may be doing a 15x15 or 16x16.
For help on locating chunk boundaries, see the chunks page.
noinclude>